VarnishのEnterprise版で利用できるパラレルESIがcommunity版でも使えるものをUPLEXが公開してくれました。
ヘビーにESIを利用する人はそこまでいない気もするのですが、これがまたなかなか便利なので紹介します。
ビルド方法
このvmodはVarnishの内部関数に深く依存しているため、ビルド時にはVarnishのコードが必要でビルドに癖があります。
また、動作時にはVarnishとビルドにつかったVarnishのコミットハッシュ値が一致している必要があります。
なお以下の環境で確認しています
| OS | Ubuntu 20.04 LTS |
| Varnish | 7.0.0 (454733b82a3279a1603516b4f0a07f8bad4bcd55) |
| vmod_pesi | master (52cd44e3d8944825d1d84a01c70002a509048c74) |
pesiは最新のコードを使えばよいかなと思いますが、もしビルドができない場合はもしブランチで7.0があればそちらを(現時点ではないですが)、もしくはコミットログを眺めて適度に巻き戻るとよいでしょう。
とりあえずVarnishとpesiのコードをダウンロードします。
ubuntu@proxy:~/tmp$ ll
total 16
drwxrwxr-x  4 ubuntu ubuntu 4096 Sep 25 21:38 ./
drwxr-xr-x 12 ubuntu ubuntu 4096 Sep 25 21:37 ../
drwxrwxr-x  3 ubuntu ubuntu 4096 Sep 20 23:33 libvdp-pesi-master/
drwxrwxr-x 15 ubuntu ubuntu 4096 Sep 24 02:18 varnish-cache-master/
一旦こんな感じのパスで説明します。
事前準備
まずはVarnishをautogen.sh / configure / makeしておきます。
ubuntu@proxy:~/tmp$ cd varnish-cache-master/
ubuntu@proxy:~/tmp/varnish-cache-master$ ./autogen.sh
ubuntu@proxy:~/tmp/varnish-cache-master$ ./configure
ubuntu@proxy:~/tmp/varnish-cache-master$ make
なお、make installは不要です。
次にpesiの直下にvarnishのソースツリーにあるm4フォルダをコピーします。
ubuntu@proxy:~/tmp$ cd libvdp-pesi-master/
ubuntu@proxy:~/tmp/libvdp-pesi-master$ cp -rp ../varnish-cache-master/m4 ./
configure.acにあるVarnishのバージョン指定をtrunkからインストールしているVarnishのバージョンに変更します。(今回は7.0.0)
ubuntu@proxy:~/tmp/libvdp-pesi-master$ diff configure.ac ../org/configure.ac
56c56
< VARNISH_PREREQ([7.0.0])
---
> VARNISH_PREREQ([trunk])
次にsrc/Makefile.amに1行追加します。(こちらは今PR投げてるのでもしかしたら直るかもしれないです)
ubuntu@proxy:~/tmp/libvdp-pesi-master$ diff src/Makefile.am ../org/src/Makefile.am
72,73d71
< vmod_pesi_debug.lo: vcc_pesi_debug_if.h
<
とりあえずここまででビルド準備ができました。
ビルド/インストール
ここで注意がいるのはVarnishのソースの場所をフルパスで指定することです。
ubuntu@proxy:~/tmp/libvdp-pesi-master$ ./autogen.sh
ubuntu@proxy:~/tmp/libvdp-pesi-master$ ./configure VARNISHSRC=/home/ubuntu/tmp/varnish-cache-master

ubuntu@proxy:~/tmp/libvdp-pesi-master$ make
ubuntu@proxy:~/tmp/libvdp-pesi-master$ make check
ubuntu@proxy:~/tmp/libvdp-pesi-master$ sudo make install
これでインストール完了しました。
使ってみる
使いかたは簡単で
import pesi;

sub vcl_backend_response {
  set beresp.do_esi=true;
}

sub vcl_deliver{
  pesi.activate();
}
これだけです。(細かい使いかたは README に)
とりあえずこの状態で通常のESIとパラレルESIを比較してみましょう。
$ cat esi1.html
<html>
<body>
<esi:include src="./time.php?t=1&s=1"/>
<esi:include src="./time.php?t=2&s=2"/>
<esi:include src="./time.php?t=3&s=3"/>
</body>
</html>
$ cat time.php
<?php
$s=(int)$_GET['s'];
if($s >10)$s=10;
if($s==0) $s=1;
echo $_GET['t'];
echo " ";
echo "start:".date(DateTime::ISO8601);
echo " ";
sleep($s);
echo "end:".date(DateTime::ISO8601);
echo "<br>\r\n";
コードはこんな感じで1,2,3秒スリープするPHPをincludeします。
通常のESI
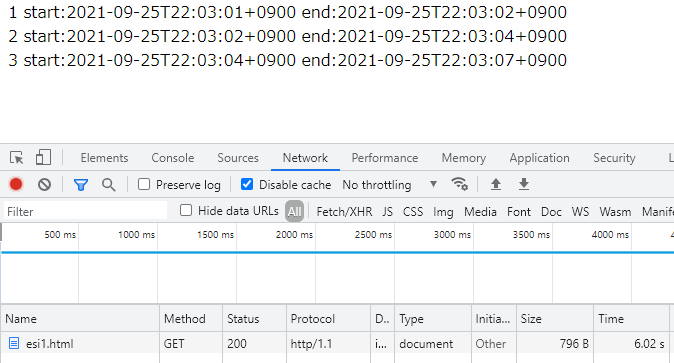
シーケンシャルに処理しているため1+2+3で6秒かかっています。
パラレルESI
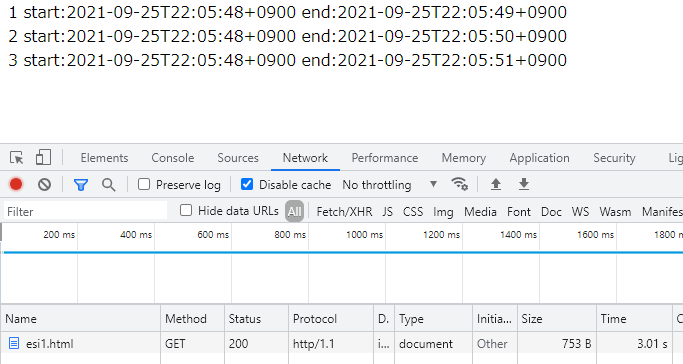
パラレルで処理しているため、ベースページ(esi1.html)が読み込まれた後に子ESIのfetchが一気に走っています。
ちなみにESIをネストしても結果は期待通りです。
ESIネスト
<html>
<body>
        <esi:include src="./time.php?t=C%3Cesi%3Ainclude+src%3D%22.%2Ftime.php%3Ft%3D1%26s%3D1%22%2F%3EC%3Cesi%3Ainclude+src%3D%22.%2Ftime.php%3Ft%3D1%26s%3D1%22%2F%3E&s=1"/>
        <esi:include src="./time.php?t=C%3Cesi%3Ainclude+src%3D%22.%2Ftime.php%3Ft%3D2%26s%3D2%22%2F%3EC%3Cesi%3Ainclude+src%3D%22.%2Ftime.php%3Ft%3D2%26s%3D2%22%2F%3E&s=2"/>
        <esi:include src="./time.php?t=C%3Cesi%3Ainclude+src%3D%22.%2Ftime.php%3Ft%3D3%26s%3D3%22%2F%3EC%3Cesi%3Ainclude+src%3D%22.%2Ftime.php%3Ft%3D3%26s%3D3%22%2F%3E&s=3"/>
</body>
</html>
urlエンコードしてる部分はこんな感じで。
C<esi:include src="./time.php?t=1&s=1"/>C<esi:include src="./time.php?t=1&s=1"/>
C<esi:include src="./time.php?t=2&s=2"/>C<esi:include src="./time.php?t=2&s=2"/>
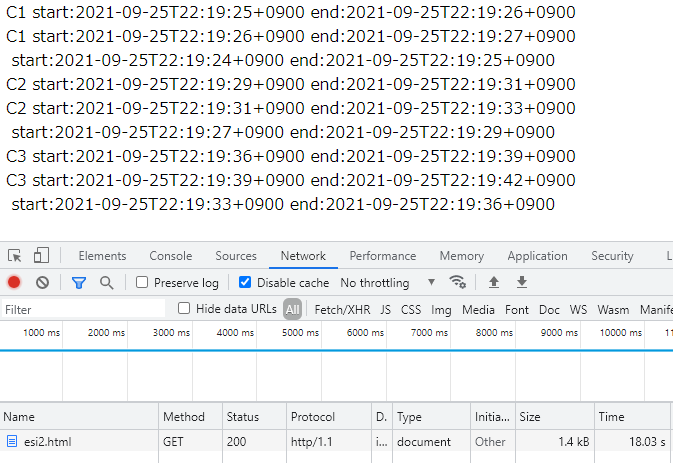
C<esi:include src="./time.php?t=3&s=3"/>C<esi:include src="./time.php?t=3&s=3"/>要は子ESIでさらに2つincludeしています。イメージは以下の通りです。
+ sleep=1
|+ sleep=1
|+ sleep=1
+ sleep=2
|+ sleep=2
|+ sleep=2
+ sleep=3
|+ sleep=3
|+ sleep=3
通常ESI
パラレルESI
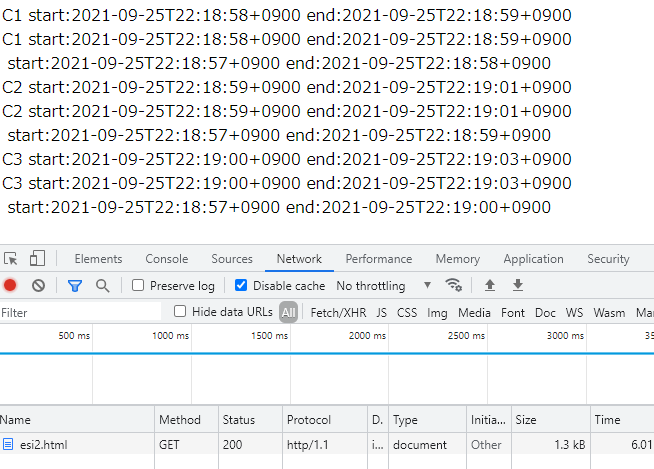
子ESIにおいてもパラレルで動いていることがわかります。
使うときの注意点
きわめて魅力的なパラレルESIですが、注意点があります。
ESIをネストしていて、パラレルESIを有効にした場合は子要素もパラレルESIを有効(pesi.activate)する必要があります。
パラレルESIを有効にしたリクエストにおいて子要素で通常のESIを行うとpanicを起こしてVarnishがrestartします。
ここら辺のことはREADMEに書いてますのでしっかり読んでおいてしっかり検証したほうがいいでしょう。
あ、あとVarnish自体のアップデート記事はそろっと書きます(本書いててサボってたけどもう書き終わってしまったので)
")
It seems now it is not possible to compile the library; I have followed your steps with the same versions (7.0) but it is complaining about this
VSC_pesi.h: No such file or directory
#include “VSC_pesi.h”
would be possible for you to double check you can still build it with latest 7.x releases and update instructions if so? Apologies for that.
Sorry, I did not notice your comment.
“VSC_pesi.h” is a file generated at make time, but perhaps autogen.sh or configure has failed.
The version of pesi has been improved a lot since then, and the “src/Makefile.am” patch is no longer necessary, but the rest of the build procedure is the same.
Please try the following
– Use the appropriate branch
– Add “autoconf-archive” (you probably don’t need a copy of m4 if you have this)
– Check for errors in autogen or configure